
Landscape Mulch Depth: Keep Trunks and Stems Clear
On this page
- Define the purpose of mulch
- Choose a material for the site
- Measure existing depth first
- Keep trunks and stems clear
- Prepare the bed without damaging roots
- Apply an even layer
- Manage slopes, paths, and drainage
- Water and inspect after installation
- Refresh by need, not calendar
- Correct over-mulching
- Mulch checklist
Mulch can moderate soil temperature, slow moisture loss, reduce splash, suppress some weeds, and give planting beds a finished surface. These benefits depend on material, depth, drainage, and placement. Piling mulch against trunks and stems or adding a new layer without measuring the old one can create moisture and maintenance problems.
There is no single depth for every material and plant. Follow recommendations from a qualified landscape professional or local extension service for the region, soil, species, and mulch type. Before ordering, measure the bed and existing layer so the delivery matches what the site actually needs.
Make a simple bed map with square footage, plants, slopes, drains, irrigation, access paths, and areas that should receive no mulch. Mark the intended material and final depth before any material arrives on site. This keeps a delivery crew from covering utility lids, piling around trunks, or treating every part of a mixed landscape alike.

Walmart Patio & Garden Services
1804 N Clinton St, Defiance, OH 43512, USA
Define the purpose of mulch
Decide whether the priority is moisture management, soil protection, weed suppression, erosion reduction, appearance, play-surface performance, or a combination. A planting-bed mulch is not automatically suitable for a playground, fire-prone zone, drainage channel, path, or pet area.
Mulch cannot correct compacted soil, a buried root flare, poor grading, a broken irrigation system, or plants mismatched to the site. Address those conditions separately. Covering a drainage or root problem can make it harder to detect.

Green Hills Contracting
Menomonee FallsWaukesha CountyWisconsin
N91W16480 Pershing Ave #5, Menomonee Falls, WI 53051, USA
Choose a material for the site
Options include arborist wood chips, shredded bark, bark nuggets, pine straw, leaves, composted materials, gravel, stone, and specialized products. Compare particle size, decomposition, movement, heat, local availability, maintenance, and effect on soil.
Ask where organic material came from and whether it is free of trash, invasive plants, and inappropriate treated wood. Do not use unknown construction debris. Stone may persist but can heat the area and complicate later planting; organic mulch breaks down and becomes part of the soil surface.
Measure existing depth first
Push a narrow ruler through the loose mulch until it reaches mineral soil in several representative spots. Avoid major roots. Record the depth near the bed edge, middle, plants, and low areas because wind, runoff, raking, and previous deliveries create uneven layers.
Separate loose mulch from decomposed organic matter when practical. If an adequate layer remains, rake and redistribute it rather than adding the same amount as last year. Calculate new material only for the depth deficit and planned expansion.
Keep trunks and stems clear
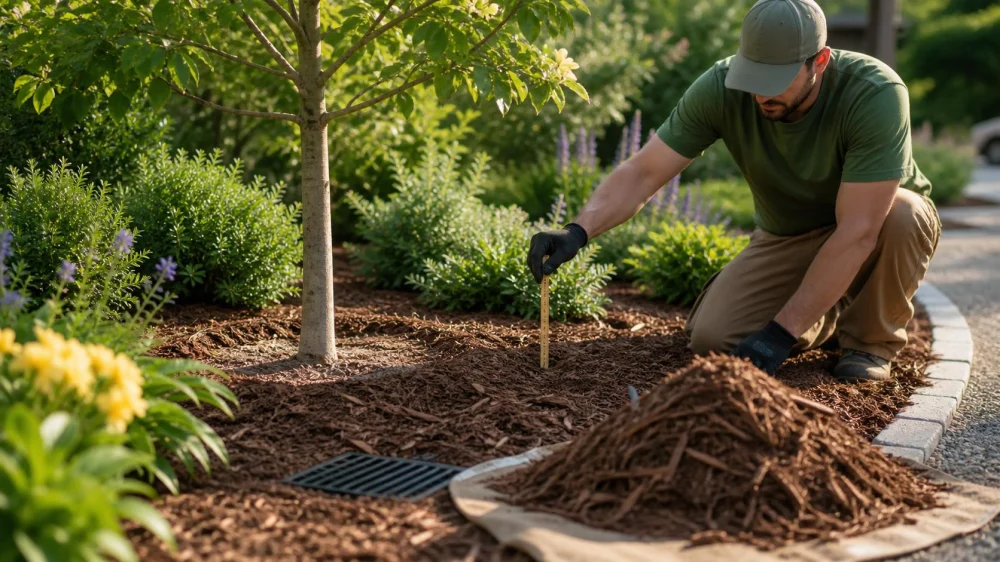
The trunk flare—the area where major roots spread from the base—should remain visible according to species and professional guidance. Pull mulch away from direct bark contact. Do not build a cone or “volcano” around a tree.
Keep mulch from touching shrub crowns, perennial stems, vegetable stalks, building siding, wooden posts, and other moisture-sensitive surfaces. The correct clearance varies, but a visible open ring makes inspection easier and reduces constant dampness against tissue.
Prepare the bed without damaging roots
Remove litter and hand-pull manageable weeds while protecting desirable roots. Identify irrigation heads, shallow cables, lighting wires, edging, and buried utilities. Do not cultivate deeply beneath trees or use equipment that cuts surface roots.
Avoid placing landscape fabric routinely beneath organic mulch when it conflicts with planting and soil goals. If an existing barrier is exposed, torn, or blocking water, ask a landscape professional whether it should be repaired or removed. Do not cover unresolved plastic sheeting blindly.
Apply an even layer
Place small piles across the bed and spread gently to the recommended final depth. Account for settling without intentionally overfilling. Use a rake around open soil and hands near delicate plants, wearing suitable gloves.
Keep the surface level enough to avoid deep pockets. Do not bury drip emitters, valve boxes, drain inlets, stepping stones, plant labels, or low landscape lights. Preserve access to utilities and maintenance points.
Manage slopes, paths, and drainage
Light material can wash from a steep slope, while dense material can redirect water. Use contours, appropriate edging, plants, or another professionally designed erosion method. Mulch should not send runoff toward foundations, neighboring property, sidewalks, or drains.
Keep walking surfaces, steps, ramps, and curb edges clear. Loose mulch on pavement is a slip and trip hazard. Maintain the intended grade and drainage gap beside siding, doors, and weep openings.
Water and inspect after installation
Check soil moisture beneath the mulch rather than judging the dry surface. Adjust irrigation only from actual conditions and plant needs. Some fresh mulch may initially shed water, so verify that irrigation reaches the root zone instead of running away.
After rain or watering, inspect for floating material, erosion, ponding, buried emitters, and mulch washed against trunks. Redistribute small shifts promptly. Investigate persistent puddles or washouts instead of repeatedly adding material.
Refresh by need, not calendar
Organic mulch decomposes at different rates with climate, material, microbes, irrigation, and traffic. Measure before every refresh. Raking can restore appearance and loosen a crust without increasing total depth.
Color fading alone does not mean the layer has stopped functioning. Dye or a thin cosmetic topcoat may change appearance, but verify product suitability, pet and plant considerations, and runoff behavior. Avoid unnecessary annual accumulation.
Correct over-mulching
If mulch is too deep, remove it gradually with hand tools around roots and stems. Do not scrape bark or cut roots while finding the original grade. Bag or redistribute clean excess where another bed has a verified need.
Contact an arborist when the root flare is deeply buried, roots grow upward into a mound, bark is decayed, mushrooms appear at the base, or the tree shows decline. Removing material does not reverse every underlying planting problem.
Mulch checklist
Define the purpose, choose suitable material, measure several depths, calculate the deficit, locate utilities, clear trunks and stems, protect roots, spread evenly, keep drainage open, and inspect after weather. Photograph the finished bed and record the date and amount.
Mulch performs best as a measured surface layer rather than a yearly pile. Keeping bark, stems, paths, drains, and structures clear protects the landscape while preserving the intended moisture and weed benefits. Measure first, then add only what the site needs.





 Golden Willow Landscaping Inc.4.0 (31 reviews)
 The Peters Group LLC4.0 (129 reviews)
 Superior Mowing & landscaping4.0 (7 reviews)
 Seasonal Landscape Solutions4.0 (77 reviews)
 Mariani Landscape4.0 (96 reviews)
 KG Landscaping +5.0 (7 reviews)
 How to Grow Herbs and Vegetables in Limited Space
 Landscape Mulch Depth: Keep Trunks and Stems Clear
 How to Install Low-Voltage Lighting in Your Garden: A Step-by-Step Guide
 How to Use Decorative Gravel & Stone Finishes for Stunning Landscapes
 How to Design a Garden That Changes All Year
 Sustainable Landscape Practices for Eco-Conscious Homeowners