
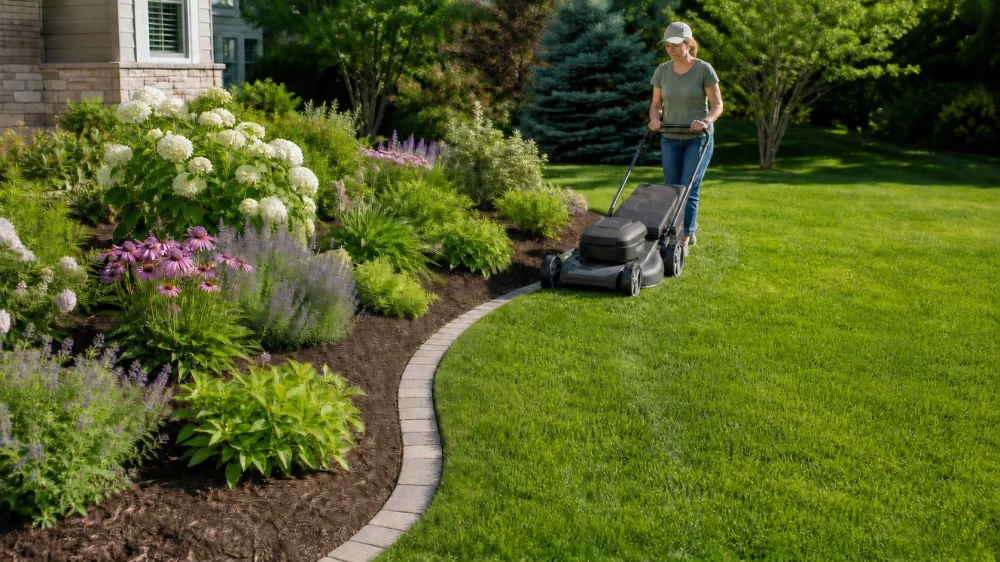
How to Shape Garden Bed Edges for Easier Mowing
In this guide
Garden-bed edges define a landscape, but their shape also determines how much trimming follows every mow. Tight waves, sharp interior corners, isolated pockets of turf, and raised borders can force a mower to reverse repeatedly or leave strips that only a string trimmer can reach. A maintenance-friendly edge uses broad geometry, stable grades, and a material that fits the mower, soil, climate, and style of the property.

O'Donovan Landscaping & Nursery
PlainfieldKendall CountyIllinois
2884 IL-126, Plainfield, IL 60544, USA
Quick answer
For easier mowing, use long smooth lines, broad curves, and generous outside corners. Eliminate narrow grass channels and tiny islands that a mower cannot enter. Where appropriate, install a firm flush edge that lets mower wheels overlap without dropping into the bed. Keep edging stable, visible, and away from trunks and surface roots. Test the layout with a garden hose and drive the actual mower route before cutting sod or buying material.

Brad's Proscapes Inc | Landscaping & Hardscapes
10395 Glen Abbey Close #2945, Rockford, IL 61107, USA
Design the edge around maintenance
A bed line is often drawn from a window or patio for visual effect, but it is maintained from behind a mower. Consider both views. The edge should frame plants and connect landscape elements while allowing the machine to move in continuous passes. Every indentation adds perimeter and every tight turn adds handling time.
Decide the desired maintenance level before choosing a shape. A crisp formal edge may need frequent recutting. A metal or masonry boundary has installation cost but may hold a line longer. A naturalized planting can use a mown strip as an intentional frame. No edge is maintenance-free; the question is which tasks fit the household.
Map the mower route
Measure the mower deck and the total machine width, including wheels. Note the turning radius, discharge direction, and whether the mower is pushed, self-propelled, or ridden. A line that works for a compact push mower may be awkward for a riding mower. Follow manufacturer safety instructions and never test turns with bystanders nearby.
Walk the entire lawn and mark obstacles: trees, posts, downspouts, slopes, drain inlets, play equipment, utility covers, and gates. Look for places where the mower must reverse, straddle a drop, or pass between two hard objects. These friction points are candidates for a broader bed, a connected planting area, or a different route.
Sketch the preferred mowing pattern. A strong edge often parallels the natural pass for a distance rather than constantly crossing it. Make room at the end of a run for the mower to turn without entering a bed or compacting soil around plants.
Draw curves a mower can follow
Broad curves look calmer and are easier to maintain than a series of small scallops. A mower should be able to follow the arc with steady steering. If the operator must stop and pivot every few feet, the radius is too tight for the equipment.
Use a long garden hose or flexible rope to lay out the proposed line. View it from the street, windows, patio, and mower position. Remove unnecessary wiggles. Curves should respond to something—a tree group, building corner, path, view, or change in grade—rather than wander without purpose.
As a visual test, look along the line at a low angle. Kinks that are invisible from above become obvious. Move the hose until the transition into each curve is gradual, then mark the final route according to local requirements and site conditions.
Handle corners and narrow turf
Inside corners are difficult because the mower deck cannot reach deeply into them. Round the corner or enlarge the bed so the lawn line sweeps around it. Outside corners should also provide enough room to turn without a wheel entering loose mulch.
Narrow turf between a bed and a fence, wall, sidewalk, or second bed often becomes a trimming strip. Compare its width with the mower. If the deck cannot pass comfortably, either widen the turf route or connect the beds and remove the sliver of grass. Small triangular lawn remnants near driveway curves are another frequent source of extra work.
Do not create an edge that traps water or blocks drainage. The easiest shape to mow can still be wrong if it directs runoff toward a foundation or covers a swale. Grade and drainage remain part of the layout.
Compare edge types
Spade-cut or natural edge
A cut soil edge is visually subtle and uses no manufactured material. It can separate turf from mulch effectively but needs periodic recutting as grass creeps and soil slumps. Pennsylvania State University Extension demonstrates using a flat-bladed shovel or half-moon edger to define a new bed. Local soil type and turf vigor influence how long the line stays crisp.
Metal edging
Metal can create a thin, durable line and smooth curves. It must be installed to the correct height, joined securely, and finished without exposed sharp ends. Product, soil, frost, and manufacturer instructions determine anchoring. Do not leave a blade-like top projecting where people, pets, or mower tires can contact it.
Plastic or composite edging
Flexible products are accessible and can form curves, but shallow or poorly anchored sections may heave, wave, or rise into the mower path. Choose an outdoor-rated system suited to climate and install every connector and stake as directed.
Brick, paver, or stone mowing strip
A broad, flush masonry strip can allow mower wheels to overlap the edge and reduce trimming. It needs a stable base and careful grade so pieces do not rock, settle, or catch water. Loose individual stones or high cobbles are decorative but often increase trimming.
Concrete curb
A continuous curb creates a strong permanent boundary. A raised curb blocks mower overlap; a well-designed flush band is easier to mow across. Concrete changes drainage and is difficult to revise, so confirm the layout and expansion details before installation.
Set height and grade correctly
For a mow-over edge, the top should be flush with the adjacent stable surface according to the edging system and mower requirements. If it sits too high, the deck or blade can strike it. If it sits too low, a wheel may drop and scalp the lawn. Settlement and frost movement can change the height after installation, so inspect it seasonally.
Keep mulch below the crown of turf and prevent it from spilling onto the lawn. Mulch piled above an edge can retain moisture against grass and migrate under mower wheels. Soil in the bed also should not bury siding, tree flares, irrigation components, or drainage openings.
On slopes, a loose flush edge may wash out or allow mulch to move downhill. Terracing, stabilized planting, or a professionally designed retaining solution may be more appropriate. Walls above local height thresholds can require engineering or permits.
Create safer edges around trees
A bed around a tree can keep mowers and trimmers away from bark, reducing mechanical injury. Make the ring or connected bed wide enough that the mower follows a broad outer curve. Do not build a tiny circle that requires constant pivoting.
Preserve the visible root flare and keep mulch away from the trunk. Do not cut major roots to create a perfect edge or raise soil over the root zone. Existing surface roots often indicate that turf is a poor fit; expanding a mulched or planted area may be safer than trying to force a mower between roots.
Avoid edging that forms a rigid collar around a growing trunk. Trees increase in diameter, and roots need water, air, and space. Consult a certified arborist when grading, trenching, or construction may affect important roots.
Lay out before installation
- Verify boundaries and utilities. Use the required locating service before digging and identify private irrigation or lighting lines separately.
- Place a hose or rope. Build long transitions and remove tight waves.
- Test the mower. With the mower off while measuring and then operated safely under normal conditions, confirm turning and overlap space.
- Mark bed contents. Check mature plant spread, tree roots, drainage, and irrigation before removing turf.
- Price the full perimeter. Complex lines use more material, connectors, stakes, labor, and future trimming time.
- Build a small section correctly. Verify base, height, and appearance before committing to the entire yard.
Follow manufacturer details for material-specific depth, joints, expansion, and anchoring. Wear appropriate protective equipment when cutting masonry or metal, and use qualified contractors for concrete, drainage, utility, or slope work beyond your experience.
Maintain a clean boundary
Inspect edges at the start and end of the growing season. Reset loose stakes, sunken pavers, raised corners, and separated joints before they become mower hazards. Pull creeping grass while it is limited rather than waiting until rhizomes spread through the bed.
Use a half-moon edger or appropriate tool to refresh natural lines. Avoid repeatedly cutting deeper and enlarging a trench without purpose. Sweep clippings and soil from hard edges so the boundary stays visible. Adjust sprinkler heads and drip lines to prevent erosion or overspray.
As plants mature, prune them away from the mower route or widen the bed. The designed edge should reflect real plant size. If every mowing requires pushing foliage aside, the planting and circulation plans are in conflict.
Common mistakes to avoid
- Adding many tiny curves: They increase perimeter and require constant steering.
- Measuring only the deck: Wheels, handles, discharge chutes, and turning space also matter.
- Leaving a narrow grass ribbon: If the mower cannot enter, redesign the bed connection.
- Installing edging too high: It becomes a collision and trip hazard.
- Ignoring settlement: A flush strip needs a proper base and seasonal inspection.
- Cutting roots for geometry: Adapt the line to the tree, not the tree to the line.
Frequently asked questions
Are straight edges easier to mow than curves?
Long straight lines are easy, but broad smooth curves can be equally practical. Tight or irregular curves create the difficulty.
What edging eliminates all trimming?
No material guarantees zero trimming. A stable flush mowing strip can reduce it, but grass growth, settlement, obstacles, and mower design still require occasional detail work.
How wide should a mowing strip be?
It should safely support the mower wheel overlap and fit the equipment, material system, and site. Measure the actual mower and follow manufacturer and installer guidance rather than applying one universal width.
Can I use loose rocks as edging?
Loose stones can shift into the mower path, create gaps for weeds, and require trimming around each piece. A properly based continuous stone or paver strip is usually easier to maintain.
Should the bed edge follow the house foundation?
It may echo the architecture, but also needs to respond to doors, downspouts, paths, plants, drainage, and mower turns. A thoughtful transition is better than copying every wall offset.
Make every pass simpler
A good garden edge is both a visual line and a route for maintenance. Map the mower, remove narrow turf, replace fussy waves with broad geometry, and choose an edge that can remain stable at the correct height. Protect trees, drainage, and utilities during installation. When the mower can follow the bed in a smooth, continuous pass, the landscape looks cleaner and demands less repetitive detail work.





 Needhams Leaf & Lawn Services LLC4.0 (24 reviews)
 Stacy's Lawn Care LLC5.0 (13 reviews)
 Hewins Lawn Care5.0 (9 reviews)
 Hilliard Sodding & Landscaping5.0 (2 reviews)
 Maske's Organic Gardening4.0 (26 reviews)
 Santiago's Landscaping llc4.0 (50 reviews)
 Best Native Plants for Drought-Tolerant Landscaping: A Guide for Sustainable Gardening
 How to Design a Family-Friendly Backyard Without Losing Style
 How to Landscape Around Solar Panels or Roof Gardens
 How to Use Shade Plants Under Trees
 How to Add Curves and Flow to Landscape Design Naturally
 How to Build a Wildlife Habitat Garden That Supports Biodiversity