
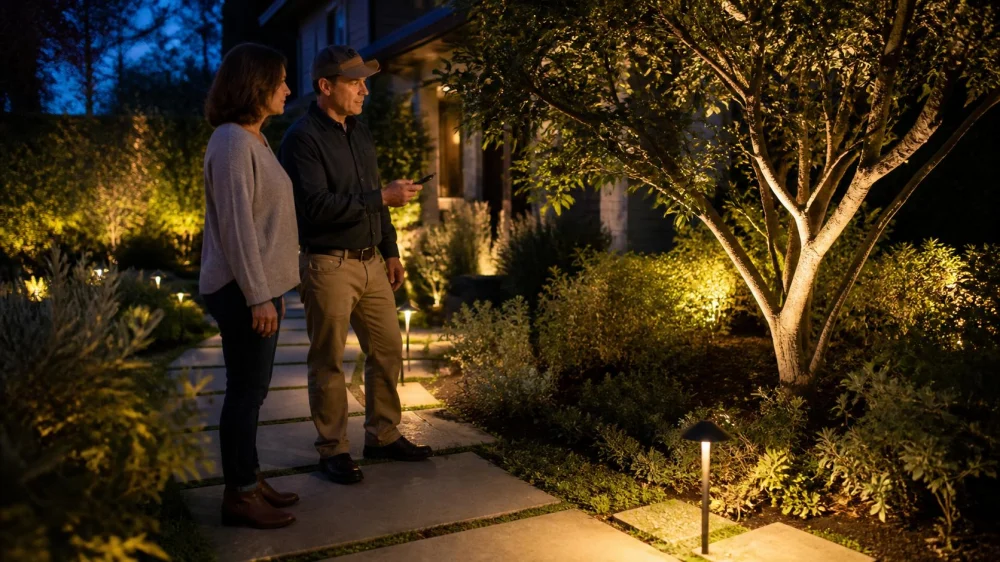
Landscape Lighting Walkthrough: Aim, Glare, and Controls
Table of contents
Quick answer: Review landscape lighting after dark from the places people actually use: paths, doors, seating areas, windows, the street, and neighboring property lines. For every fixture, identify its job, look for exposed bright sources, confirm the beam stays on the intended surface, and test timers or sensors. Record adjustments for a qualified installer rather than opening fixtures or changing wiring yourself.

Landmark Landscapes Inc
Sheboygan FallsSheboygan CountyWisconsin
300 Forest Ave, Sheboygan Falls, WI 53085, USA
Define what each light should do
Give every fixture a clear purpose: path, step, door, work area, address visibility, or accent. Mark that job on a simple property sketch. A fixture without a purpose often becomes clutter, glare, or unnecessary operating time.
Do not assume brighter is safer. Strong contrast can make the surrounding route harder to read. Keep emergency access, cameras, and local requirements separate from decorative preferences. Verify a camera's actual image, and confirm any entrance or address rule with the relevant authority or property manager.

Hernandez Landscaping llc
MilwaukeeMilwaukee CountyWisconsin
2507 W Grant St, Milwaukee, WI 53215, USA
Walk the property after dark
Wait until the sky is dark enough to reveal beam edges and reflections. Bring the plan and a phone for notes; add another adult if the site has steps or uneven ground. Do not make electrical adjustments during the walk.
- Start at the normal arrival point and follow the route to the main door.
- Walk every path in both directions; a shielded light can still glare from the opposite approach.
- Pause at steps, grade changes, gates, seating, grills, trash storage, and hose crossings.
- Look outward from ground-floor windows and any bedroom that faces the yard.
- View the property from the sidewalk, driveway, and legal property boundary.
- Photograph each concern from the exact viewing position and note the fixture number.
Check whether foliage hides a light or casts confusing shadows. Wet paving, pale walls, glass, and glossy leaves can change reflections. A later review after rain may reveal glare, but stay off slippery areas.
Check aim, glare, and spill
Prioritize normal eye levels and routes. Record any exposed bright source at doors, turns, seating, and windows. A shield, lower mounting position, different aiming angle, or lower output may help, but the correct remedy depends on the fixture and installation.
Follow each beam to its edge. Uplights should not send most of their output past a small canopy into the sky. Wall accents should remain on the intended wall. Path lights should illuminate walking surfaces rather than neighboring windows. Avoid aiming changes that create a new dark gap, shine into traffic, or place a hot fixture against plants.
Phone cameras may exaggerate or conceal contrast. Pair images with notes such as “source visible from bench” or “beam crosses bedroom window.”
Review controls and seasonal changes
Test switches, timers, photocells, and motion sensors. Record when lights turn on, how long they remain on, and what each control operates. Never open energized equipment merely to identify a circuit.
Match schedules to actual use; entry lights may differ from decorative accents. Motion sensors should detect people without repeatedly triggering on traffic, branches, or small animals.
Repeat the review when plants leaf out, snow changes reflection, or outdoor use shifts. Growth can block shields or redirect beams, so add checks to the maintenance calendar.
Installation and maintenance boundaries
Low-voltage does not mean risk-free. Outdoor systems face water, damaged cable, corroded connectors, mowers, excavation, and overloaded equipment. Do not splice wires, open transformers, bypass protective devices, or substitute lamps or drivers unless you are qualified and the work follows the equipment instructions and applicable electrical rules.
Look for leaning fixtures, cracked lenses, loose shields, exposed cable, standing water, scorching, flicker, or repeated trips. Switch off the affected system using its normal control and contact a qualified installer. Before digging, use the local utility-location process and confirm private utilities as needed.
Keep a closeout record with the fixture plan, product instructions, control settings, transformer information, installer contact, warranties, and dated nighttime photos. These records make later repairs and additions less speculative.
Frequently asked questions
How many path lights do I need?
There is no universal spacing. Fixture distribution, mounting height, path width, curves, steps, surface color, and nearby light all matter. Ask for a nighttime demonstration or temporary layout before final placement.
Should all fixtures have the same brightness?
No. Output should match the task and viewing distance. Consistency can come from comfortable transitions and coordinated color appearance, not identical output everywhere.
Can I aim an uplight into a mature tree?
Possibly, but check whether the beam remains within the canopy, creates bedroom glare, affects neighbors, or disturbs sensitive habitat. Use the least output and operating time that achieves the intended effect.
When should the walkthrough happen?
Review before final acceptance, again after plants establish, and whenever seasonal growth, a renovation, new seating, or a complaint changes the lighting context.
Next steps
Turn the nighttime walk into a short punch list. For each item, include the fixture number, viewing location, intended job, observed problem, photo, and proposed review. Rank trip-route and electrical concerns first, then glare and schedule issues, then decorative refinements. Have the installer demonstrate the revised system after dark and update the plan and control settings when the work is complete.




 Eco Harmony Landscape & Design4.0 (46 reviews)
 Foxcroft Meadows Sod4.0 (50 reviews)
 C & L Lawncare3.0 (12 reviews)
 Midwest Block and Brick - Quincy4.0 (16 reviews)
 Turf Tenders Inc0.0 (0 reviews)
 Duran's Landscaping2.0 (3 reviews)
 How to Revive Dead Grass: A Complete Step-by-Step Guide to Lawn Care
 How to Create a Low-Water Turf Alternative | Beautiful Landscapes
 How to Landscape Around Solar Panels or Roof Gardens
 How to Protect Existing Trees During a Landscaping Project
 How to Grow a Native Plant Garden with Minimal Care – Expert Tips
 Tips for Maintaining a Lawn in a Hot, Dry Summer